Visual GUI Testing
Table of Contents
Calling a Script with Parameters
Running Scripts from a Batch File
Run a script stored in a bundle
Repeat one or many scripts several times
Generating Reports from a Batch File
Running Scripts from Microsoft Visual Studio
Vector Based Image Recognition
Multi-Threaded Image Detection
Using the EyeAutomate API from Java
EyeAutomate is a visual script runner. A visual script contains images that are located using the Eye image recognition algorithm. Edit the visual scripts in EyeStudio or using a text editor.
There are three generations of automated GUI test tools:
EyeAutomate support techniques from all the three generations.
EyeAutomate is 100% pure Java and contains no native code. This means that you will be able to create and run scripts on any platform that supports Java. EyeAutomate can also be used for automating any type of application that has a user interface regardless of how it is implemented.
All commands are provided with both binary and source code in the “custom” folder. Adjust existing commands or create your own. All commands are loaded dynamically from the “custom” folder.
EyeAutomate is built around the Eye that contains the image recognition algorithm. The image recognition needs to be both fast and tolerant to be efficient for test automation.
The Eye can locate images on any number of displays and uses all CPU’s available. A higher screen resolution will reduce the detection speed while the number of available CPU’s will increase the detection speed.
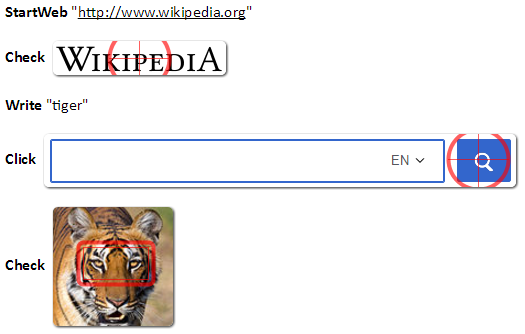
Use EyeStudio or a normal text editor to edit the scripts. Specify one command on each row in a script. A command may take one or more command parameters separated by spaces. Place quotes around parameters that contain spaces:
Type “This is a test”
Select a command in EyeStudio and press the F1 key for context sensitive help.
A script in EyeAutomate is visually readable and consists of commands, images, data and widgets.
A visual script may consist of four types of files:
Example of a visual script:
A bundle is a zip file, with an “.eye” extension, that contains everything needed for a visual script to run. A bundle contains scripts, images, data, widgets and commands.
Note that a bundle also contains the commands needed to run the script to make it really easy to move a script from one installation to another.
A typical scenario is to develop the bundle on one machine and use another machine for running the bundle periodically or on demand.
Note that you may rename (to “.zip”) and extract the bundle using unzip.
Images are used by many of the commands to find something on the screen instead of specifying the exact coordinates. Images are captured with the Recorder or using the Insert / Image button in EyeStudio.
Images will work even if there are only portions that actually matches some part of the screen. The Vizion Engine focuses on the similarities rather than the differences between the actual and recorded appearance.
The target location, marked by a circle, is in the center of the image, by default. The target location is more important than the boundaries.
Change the target location by selecting another target location within the image using the Properties dialog. Click on an image to open the Properties dialog.
Use a target area if you get an incorrect result when using a target location. Click on an image and use the Properties dialog to place the selection rectangle around the target area. The target area will be matched in detail (95% correct, by default) while the rest on the image will be verified in less detail (30% correct, by default).
A Click command will click in the center of the target area.
Use larger images since they contain more information in order to find the right match. Make sure to specify a target location or area within the image.
Using a target area is very important in combination with the Search command to avoid finding something similar before finding the actual image. You may also avoid an incorrect match by increasing the ConfirmationLevel.
Image paths can be either relative or absolute. Relative paths are, by default, relative to the EyeAutomate installation folder (that contains the "EyeAutomate.jar" file), for example:
"images/1339591239425.png".
An absolute path is platform dependent and might look something like:
"C:\EyeStudio\images\51339591239425.png".
Scripts, images, data and widgets are, by default, stored in the “scripts”, “images”, “data” and “widgets” folders located in the EyeAutomate installation folder.
Use the built-in parameters "ImageFolder" or "ScriptFolder" to make it easier to locate and switch between images or to make relative Calls to other scripts.
Images are, by default, placed in the "images" folder. The "ImageFolder" parameter points to this folder, by default, and the recorder adds this parameter to any new image path created to make it easy to switch image folder. Changing the "ImageFolder" parameter will also change the default location of new images. For example: "{ImageFolder}/1339591239425.png".
You may modify the RootFolder using the Settings/Set Image Folder option in EyeStudio.
The "ScriptFolder" parameter contains a relative or absolute path to the folder of the current script. Use the "ScriptFolder" parameter to refer to scripts or images located in the same or in a folder below the current script. For example: "{ScriptFolder}/images/1339591239425.png".
Use the “RootFolder” parameter in the “parameter.properties” file to select another root folder for the “scripts”, “images”, “data” and “widgets” folders. This can be valuable when using an external version handling system. Add, for example, the line below to the “parameter.properties” file:
RootFolder=C\:/EyeAutomateData
You may also modify the RootFolder using the Settings/Set Root Folder option in EyeStudio.
Note that you need to escape the colon with a backslash in the Java properties file!
Move the “scripts”, “images”, “data” and “widgets” folders from the EyeAutomate installation to the new root folder “EyeAutomateData” so that you get the folder structure below:
EyeAutomateData
data
images
scripts
widgets
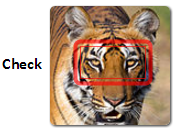
Widgets makes it easier to maintain targets in the user interface. A Widget is a small script that contains a prioritized list of Properties. A Property can be an image, a location or an identifier that can be used to locate a target. The Widget script is executed one command at a time until a command finds a target location. The script execution will not stop even if a command fails.
Example of a script that uses two Widgets:
The Eye finds the best visible match. If there are several identical matches it will return them in order of distance from the current location. The current location is in the upper-left corner of your desktop from the beginning.
Many commands in EyeAutomate can take a text instead of an image as a parameter. The current font setting is used when creating an image from the provided text. See the Font command for details about how to change the current font.
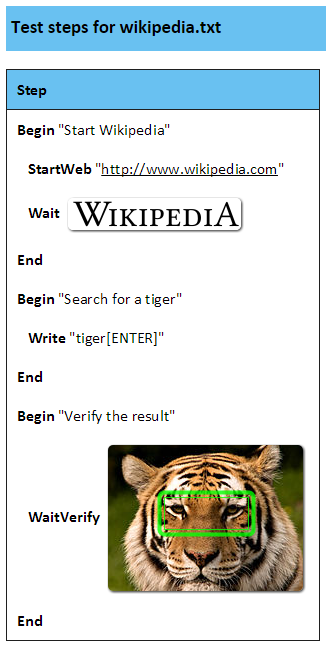
A visual script can be divided into Steps. There are mainly two reasons for dividing a script into Steps:
To make the script easier to read and understand.
To turn an automatic script into a semi-automatic script.
A step begins with a Begin command and ends with an End command. Steps can be nested to form a hierarchy. A step description may consist of both text and images.
Steps can be created before or after creating a script. Creating a number of steps before creating a script is useful when preparing the outline for a semi-automatic script.
A script containing one or several empty steps can be run just like a script that contains commands only. An empty step will behave like a manual test instruction.
Select some commands and use the Insert / Step button to turn the selected commands into a Step. Enter a step description and select the OK button.
Parameters can be used to make a script more reusable. Parameters are enclosed in brackets and are case sensitive, for example: {delay}. EyeStudio will automatically ask the user to provide a value for an undefined parameter after pressing the Run button. Parameters can be passed from one script to another using the Call command. A parameter may also be assigned a value using the Set command.
Parameters are inherited from a calling script to a called script. Parameters that are defined or modified by a called script are not visible to the calling script.
There are built-in parameters that are set by EyeAutomate during script execution. Built-in parameters are listed in the table below:
Parameter | Description |
CurrentX | The last X-coordinate set by the MouseMove or WaitMouseMove commands. Useful for moving one coordinate only. |
CurrentY | The last Y-coordinate set by the MouseMove or WaitMouseMove commands. Useful for moving one coordinate only. |
ImageFolder | The image folder used by EyeStudio, default set to “images”. Change image folder used by the editor using the Set image folder option in the Settings menu. |
ManualTestResult | The entered Result from the Manual Test Dialog. |
ScriptFolder | The absolute or relative path to the folder of the current script. |
The “parameter.properties” file contains the ImageFolder parameter, the RootFolder parameter and user defined parameters inherited by all scripts.
Example of a “parameter.properties” file:
RootFolder=C\:/EyeAutomateData
MyFolder=Test
ImageFolder=images
Note that you need to escape a colon with a backslash in the Java properties file. Also use forward slashes instead of backslashes in a Java properties file.
Use the Settings \ Set Parameter option in EyeStudio to insert or modify a parameter in the parameter properties file.
Use a data (CSV - Comma Separated Values) file to pass parameters to the script. This makes data-driven testing possible. Specify one parameter per column in the data(csv) file. The script will be executed one time for each row in the data(csv) file.
Specify the parameter names in the first line of the data(csv) file. Parameter names are case sensitive. You may use any common (like comma, TAB, colon, pipe, semicolon) column delimiter; EyeAutomate will automatically detect the delimiter used.
Run a script given a data file using the Run with Data File option in the Script menu.
Data File Example:
LoginId Password MenuItem
Tom Secret File
Erica Secret Edit
EyeStudio is a visual script editor. Use EyeStudio to create and maintain scripts and images.
Edit the script using a WYSIWYG-editor that contains both text and images.
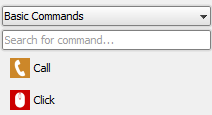
Use the Command List to select a command to insert into the script. Select from different collections of commands using the drop-down or search for a command using the search field.
Right-click a command and select Context Help from the menu to view detailed information, available parameters and examples of how to use the command.
Left-click a command to add it to the script at the current cursor position. You may need to specify a number of command parameters before the new command is added to the script.
A command may also be typed manually using the editor. Add parameters (like values, images or scripts) manually or by using the Script menu or toolbar buttons. Select a command and press the F1 key for context sensitive help.
An image can be captured or recaptured from many places in EyeStudio.
Use the mouse to press and hold the left mouse button while moving the mouse to select an area of the screen to capture. Release the left mouse button to capture the image.
Click the right mouse button to cancel the image capture.
Use the scroll wheel to zoom in or out when capturing images from the Capture Window or Remote Window. The Capture Window will appear when the screen is zoomed.
Adjust the preferred way of capturing images from the Settings/Capture Options menu.
Note than the image needs to be at least 10 pixels in width and height.
There are capture options in the Settings/Capture Options menu:
Hide Studio During Capture | Hide EyeStudio while capturing an image. |
Use Capture Dialog | Use a dialog instead of the full screen when capturing images. This is the default option for non Windows machines. |
Image names are automatically generated. You may rename images easily by right-clicking an image and selecting the Rename option. Renaming a file will also adjust the script automatically.
Note that renaming an image might cause other scripts to fail since EyeStudio will only modify the currently edited script.
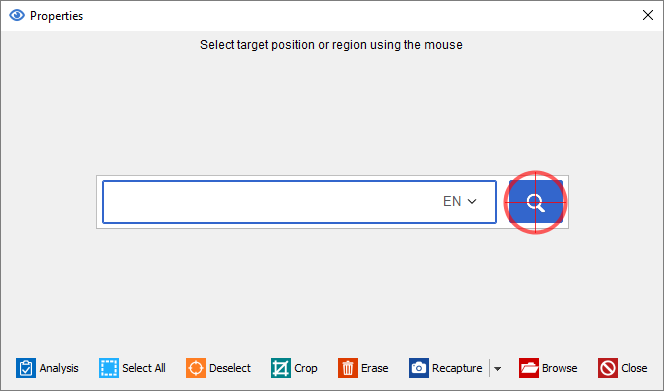
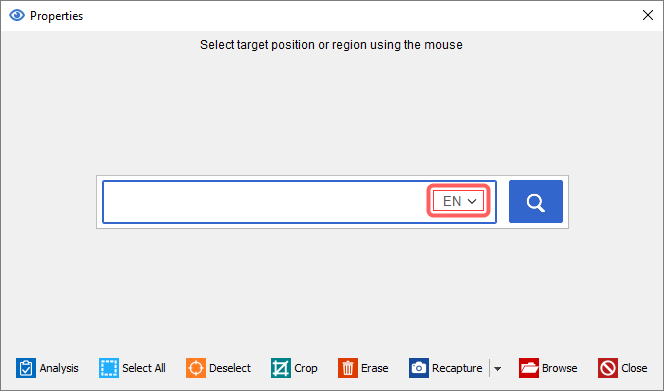
Images can be edited using the Properties dialog. You may recapture the image, load a new image, change the target location/area or modify the image. Click on an image to open the Properties dialog.
Use the mouse to select a target location, if needed. Left-click on any position within or outside the image to select a new target location. The target location is in the center of the image by default.
You may also use the mouse to click and drag in order to select a target area. The target area is indicated by a rectangle and the target location is in the center of the target area for Move or Click commands.
Use the Select All button to select the entire image.
Use the Deselect button to remove the current selection and return the target to the center of the image.
Use the Crop button to cut out everything but the selected rectangle.
Use the Erase button to remove the content in the selected rectangle that in some cases may distract the image recognition AI. The content will be replaced with the automatically detected background color.
Add blank lines and comments to the script to make the script more readable. A commented line is italic and begins with two forward slashes “//”.
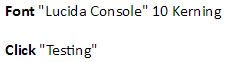
Using texts instead of images are useful when creating data driven scripts. You need to set the correct font, using the Font command, so that texts can be translated into images.
Right-click an image and select the Detect Font from Image option to automatically detect the correct font. You need to specify the text to detect from the image. In order to improve the detection speed you will also have to specify the font style. You will be asked to insert a Font command when a possible match has been detected.
Managing a large set of images can be difficult. Use the Copy Images function in the Script menu to copy all images in the current script to another location. View the script with the copied set of images by using the Set Image Folder option in the Settings menu.
Use the Copy Script function in the Script menu to copy the currently edited script to a new location. All the images will also be copied to the "images" folder below the copied script. The script and "images" folder will be created if needed. Since the images are placed relative to the script, so that the folder can be moved easily, the following Set command is appended to the script:
Set ImageFolder "{ScriptFolder}/images"
A bundle may contain scripts, images, data, widget, commands, tools or anything else required to run or edit the scripts. It is simply a zip file (with the “.eye” extension) that is unzipped in the EyeStudio root folder.
Use the File \ Import Bundle option to extract a bundle to the EyeStudio root folder. You might need to restart EyeStudio for the changes to be applied.
Export all files (like scripts, images, data, widgets and commands) used in the latest script run.
Note that you need to run the entire test or test suite before exporting the bundle so that EyeStudio can detect what files to include.
Use the File \ Export Bundle option in EyeStudio to export the bundle.
A typical scenario is to develop the bundle on one machine and use another machine for running the bundle periodically or on demand.
Select a command and press the F1 key for context sensitive help. This will open a web page with information about the command.
Settings can be found in the Settings menu in EyeStudio. Other settings can be found under All Commands in the Command List.
File Synchronization | Check this option to enable file synchronization. |
Auto Indent | Automatically insert tabs when recommended. |
Set Image Folder | Sets the default image folder. The path is available from the ImageFolder parameter and is default set to “images”. Useful when designing scripts that uses two or more sets of images. |
Set Root Folder | Sets the root folder for scripts, images and data. The path is available from the RootFolder parameter and is default set to the installation folder of EyeAutomate (the folder that contains the EyeAutomate.jar file). Change the root folder to store the “scripts”, “images” and “data” folders on another location. |
Set Parameter | Sets a parameter in the “parameter.properties” file. A parameter stored in the “parameter.properties” file can be used in any script. |
Click the Run button, or select that option from the Script menu, to run the script. The output will be displayed in the log window below the script. You may also run a portion of the script. Select a number of commands and press the Run Selection button to run the selected commands.
A script can be run manually. All commands or steps are then displayed as manual instructions. Click the Manual Run button in the toolbar or select the Manual Run option from the Script menu to run a script manually.
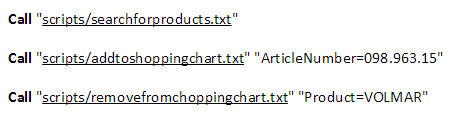
A script may call other scripts. You may create a script, or suite, that only calls other scripts. The suite would only contain a number of Call commands.
The Call command may contain parameters to the script to execute. You may also specify a number of times to repeat the script before completing. For details, see the Call command in List of Commands.
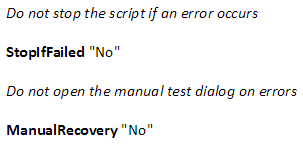
Set StopIfFailed to No to prevent a suite from stopping if any of the called tests fails.
A called script will inherit all the parameters and settings, except StopIfFailed, from the calling script.
Test Suite Example:
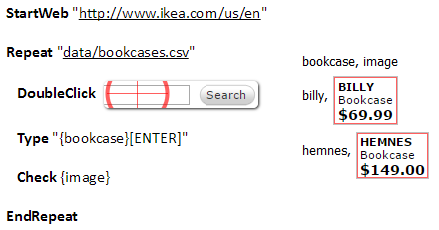
Blocks can be repeated. Use the Repeat command and specify the number of times to repeat. You may also iterate through all rows in a data file like in the example below:
The Iteration parameter will be set to the current iteration starting with 1.
Pass parameters to a script to make the script more reusable. Keys and values are separated with an “=” sign and parameters are separated by an “&” character. Provide a list of parameters before or after the script, for example:
Call “scripts/script1.txt” “sensitivity=90” “wait=1000”
Call “scripts/script1.txt” “sensitivity=90&wait=1000”
Call “sensitivity=90&wait=1000” “scripts/script1.txt”
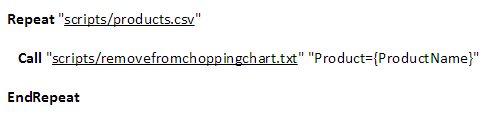
Parameters may also be stored in a data (CSV) file, like in the example call below:
Parameters may also be retrieved from a database using a Select statement. Note that the parameters: DatabaseDriverJar, DatabaseDriverClass and DatabaseConnection needs to be set before the call.
Parameters used when connecting to the database:
Parameter | Description | Default value |
DatabaseDriverJar | Path and name of the jar file that contains the JDBC driver. | mysql-connector-java-5.1.23-bin.jar |
DatabaseDriverClass | The Class name of the database driver. | com.mysql.jdbc.Driver |
DatabaseConnection | The database connection string. | jdbc:mysql://localhost/sakila?user=root&password=password |
Example of a call with parameters from a database table:
Set DatabaseDriverJar "mysql-connector-java-5.1.23-bin.jar"
Set DatabaseDriverClass "com.mysql.jdbc.Driver"
Set DatabaseConnection "jdbc:mysql://localhost/sakila?user=root&password=password"
Call "select first_name, last_name from actor;" "scripts/hello.txt"
or by using Repeat:
Repeat "select first_name, last_name from actor;"
Write "{first_name} {last_name}"
EndRepeat
You may execute one or many scripts using the “EyeAutomate.jar” file. Place the calls in a batch file to be able to execute EyeAutomate several times in order to complete an entire test suite. Use, for example, the operating system command below to run a test:
java -jar EyeAutomate.jar scripts\script.txt
The bundle will be exacted to the root folder before the run.
java -jar EyeAutomate.jar scripts\bundle.eye
java -jar EyeAutomate.jar “scripts/script 1.txt” “scripts/script 2.txt”
java -jar EyeAutomate.jar 10 scripts/script1.txt scripts/script2.txt
java -jar EyeAutomate.jar “sensitivity=90&wait=1000” scripts/script1.txt
The script will be run for each row of data in the CSV file:
java -jar EyeAutomate.jar “scripts/parameters.csv” “scripts/script.txt”
Create or update the Test Summary and Test Step Duration reports after a script has been executed using the -r command line option:
java -jar EyeAutomate.jar -r scripts\script.txt
You may export scripts to FitNesse and run the scripts there. FitNesse is an open source tool for acceptance testing and can be downloaded from: www.fitnesse.org
Follow the steps below to run a test in FitNesse:
FitNesse Test Example:
!path EyeAutomate.jar
!define TEST_SYSTEM {slim}
!|script|eyeautomate.EyeAutomateFixture|
|execute|StartWeb www.eyeautomate.com|
|execute|WaitMouseMove images/1305050944885.png|
|execute|MouseLeftClick|
|execute|WaitMouseMove images/1305050956684.png|
|execute|MouseLeftClick|
|execute|WaitMouseMove images/1305050967915.png|
|execute|MouseLeftClick|
|execute|WaitMouseMove images/1305050976639.png|
|execute|MouseLeftClick|
|execute|WaitMouseMove images/1305050992470.png|
|execute|MouseLeftClick|
|execute|WaitMouseMove images/1305051550296.png|
|execute|MouseLeftClick|
|execute|WaitVerify images/1305053760123.png|
EyeAutomate scripts can be run from within Microsoft Visual Studio. The example code below shows how to run and retrieve the output from a EyeAutomate script. Note that the EyeServer needs to be running on the machine (in this case localhost).
public void CallEyeAutomateTest()
{
var response = RunEyeAutomateTest("MyTest.txt");
Assert.IsTrue(response.StartsWith("<html>Completed"));
}
public static string RunEyeAutomateTest(string script)
{
var response = String.Empty;
var request = String.Format(@"http://localhost:1234/scripts/{0}", script);
var webClient = new WebClient();
var stream = webClient.OpenRead(request);
if(stream != null)
{
TextReader reader = new StreamReader(stream);
response = reader.ReadToEnd();
}
return response;
}
EyeAutomate scripts can be run from within a JUnit test. This is convenient when running EyeAutomate scripts in a continuous integration server like Jenkins or CruiseControl. The example code below shows how to run a script from a JUnit test and using the ScriptLoggerTest class as the script logger. The “EyeAutomate.jar” file should be added to the Java Build Path.
import org.junit.Test;
import eyeautomate.ScriptRunner;
import eyeautomate.ScriptLoggerTest;
import eyeautomate.DerivativesCache;
public class ScriptRunnerTest
{
@Test
public void test()
{
ScriptRunner scriptRunner = new ScriptRunner(new ScriptLoggerTest());
scriptRunner.setParameter("ImageFolder", "C:/EyeAutomate/images");
scriptRunner.runScript("C:/EyeAutomate/scripts/myscript.txt");
}
}
The Eye can be used in Python scripts by importing the “eye.py” library. Download the Python library from the EyeStore.
You need to start the EyeServer and have a valid license. Edit the “eye.py” file if you using anything else than localhost and port 1234.
The example below uses the “eye.py” library:
import eye
# Find all notepads
locations=eye.findImages('images/notepad.png')
if locations!='Image not found':
for location in locations:
print 'Found at: '+location[0]+', '+location[1]
# Click and type 'Hello'
eye.click(location[0], location[1])
eye.type("Hello")
else:
print 'Image not found'
The example below uses Selenium WebDriver:
import eye
# Open Wikipedia
eye.openBrowser('chrome', 'http://www.wikipedia.org')
# Find the search field
location=eye.findImage('images/search.png')
if location!='Image not found':
# Click in the search field and type 'tiger' followed by ENTER
eye.click(location[0], location[1])
eye.type("tiger[ENTER]")
# Find the tiger image
locations=eye.findImages('images/tiger.png')
if locations!='Image not found':
for location in locations:
print 'Found at: '+location[0]+', '+location[1]
else:
print 'Image not found'
# Close the browser
eye.closeBrowser()
Run options can be found in the Settings/Run Options menu in EyeStudio.
Animate Cursor | Animate the cursor for mouse moves. Set this setting to No to improve script run speed. |
Create Test Run Report | Create a Test Run Report directly after script run. |
Hide Studio During Run | Hide EyeStudio while running a script. |
Launch Test Run Report | Launch the Test Run Report directly after script run. |
Lock Screen | EyeAutomate has a built-in screen lock to prevent unauthorized people from using the computer after a script has been completed or failed. Enter a password that contains digits only. At least 4 digits must be provided. Enter the password using the keyboard to unlock the lock screen. |
Manual Recovery | Use manual recovery information when a step fails during the run. |
Run Dialog On Top | Check to keep the Run Dialog on top of other windows making it easier to stop the run. |
Save Before Run | Save any unsaved scripts before a run without asking. |
Logs are stored in the “logs” folder in text or CSV format.
All executed commands are logged in the “execution_log.txt” file. You may also see the results of any of the Verify commands. A script will terminate with an error message in the execution log if any operation fails.
All scripts are logged in the “test_log.txt” file. The log contains date and time when scripts started, completed or failed.
Statistics from the script runs are stored in the “test_history.csv” and “test_steps.csv” files. EyeStudio stores test statistics from all test runs in the CSV files.
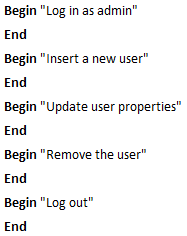
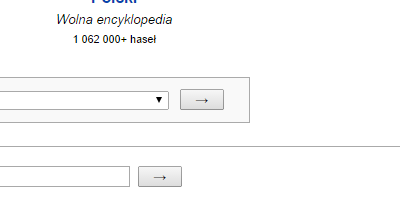
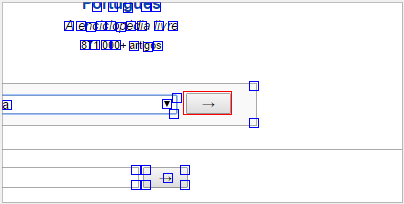
The Eye support image recognition of small screenshots. The image is first analyzed and broken down into many smaller areas of interest. The image to the left is the actual image and the image to the right contains the image analysis.
The Eye finds the best match closest to the current location.
The red target area needs to be confirmed by the blue areas in the image.A target is confirmed if at least ConfirmationLevel percent of all areas are found. The areas needs to be located relative to the target area to be valid.
EyeAutomate supports both pixel and vector based image recognition.
Change to vector based image recognition using the Recognition command like in the example below:
Recognition Vectors
Vector based recognition is a lot less sensitive to zoom and rendering details. For example, a script created in Chrome with 100% zoom will most likely still work in the Firefox browser using 150% zoom.
Make sure to include some vertical or horizontal lines in the images when using vector based image recognition. The example below is a good example:
Either is used by default and requires either a vector or a pixel match. Both requires that both vectors and pixels match the target.
The Eye uses one thread per available CPU core when finding an image. Reduce the number of threads used with the CpuUsage command.
EyeAutomate and EyeStudio can both capture image and run scripts on any monitor connected to the machine. Note that using multiple screens reduces the run speed.
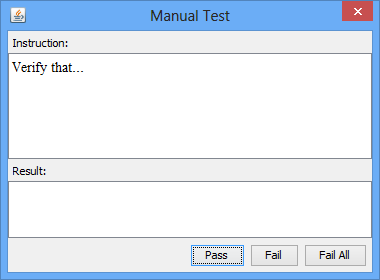
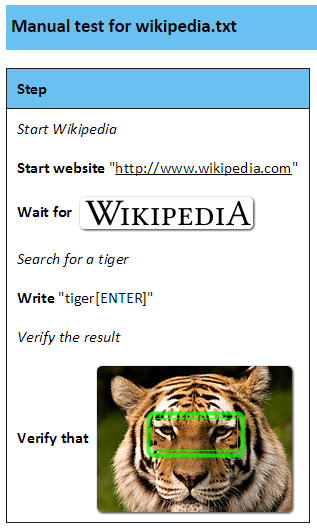
Some steps in the test case might be difficult to automate. In EyeAutomate you may create manual tests by adding an empty step. EyeAutomate will show the Manual Test dialog containing the manual test instruction. The user selects the Pass, Fail or Fail All button after trying to perform the instruction. The Fail All button will also fail any other manual test dialogs that might appear. A user may also enter a comment in the Result field.
Begin “Verify that…”
End
EyeAutomate may ask the user to complete a failed command or Step manually instead of failing the test when manual recovery is enabled. Semi-automated tests are less fragile than fully automated tests. The user may, for example, be instructed to manually click on a button that EyeAutomate failed to find.
See the ManualRecovery and Begin commands for more information.
To make a script even more reliable it is possible to insert one or many Catch commands between the Begin and End commands. The commands between the Catch command and the next Catch or End command will be executed automatically before recovering manually if the script fails before reaching the Catch command. You may insert any number of Catch commands and EyeAutomate will try them one-by-one until one of them is executed without problems.
See the Catch command for more information.
Insert encrypted text using the Insert Encrypted Text option in the Script menu. Encrypted texts are automatically decrypted by the Type and Paste commands. An encrypted text must be provided as a separate parameter to the command to be decrypted, for example:
Type “007a280819d700”
Use the EyeAutomate API to create powerful test scripts or applications in Java. The API documentation can be found in the “javadoc” folder. Make sure to add the “EyeAutomate.jar” file to the project build path.
Java API Example:
public class TestExample
{
public void RunTestExample()
{
ScriptRunner scriptRunner=new ScriptRunner(null);
scriptRunner.runScript("Click", "Click \"images/button.png\"", null);
}
}
Extend the capabilities of EyeAutomate by creating new commands using Java.
EyeAutomate loads and launches Java classes dynamically. All commands are stored in the “custom” folder. Both the compiled Class file and the corresponding source code is provided.
Modify the source code or create your own and place the compiled Class into the “custom” folder. EyeStudio will load all the classes in the “custom” folder (and sub-folders) at startup.
A custom Java Class must contain the executeCommand method:
public Boolean executeCommand(String[] commandParameters, Properties scriptParameters)
A Java command that belongs to the “custom” package and placed in the “custom” folder will automatically appear in the list of available commands in EyeStudio.
Java libraries (jar files) located in the “custom” folder are automatically loaded by EyeAutomate at runtime.
A custom Java Class may contain a getHelp method that should return an HTTP address to context help for the command:
public String getHelp()
{
return "http://eyeautomate.com/basiccommands.html";
}
Specify the parameters that the custom class might create or modify using the getParameters method. This will prevent EyeStudio from asking the value of the undefined parameter. This method should return a String array of parameters:
public String[] getParameters()
{
return new String[]{"Error", "Response"};
}
The getCommand method can be used for requesting some information from the user before adding the command to the script. The getCommand method should return the text to be added to the script.
The tag “<Image>” will be replaced, by EyeStudio, with the path of a captured image:
public String getCommand()
{
return "Move \"<Image>\"";
}
The tag “<String: text>” will be replaced with a string:
public String getCommand()
{
return COMMAND+" <String: Enter no times to repeat>...EndRepeat";
}
The string may have a default value:
public String getCommand()
{
return COMMAND+" \"<String: Enter percent value=95>\"";
}
A string can include a number of options to select from:
public String getCommand()
{
return COMMAND+" \"<String: Select algorithm=Either|Both|Pixels|Vectors>\"";
}
The setScriptRunner method can be used to receive a reference to the ScriptRunner currently used. Use the ScriptRunner to perform API methods.
public void setScriptRunner(ScriptRunner scriptRunner)
{
this.scriptRunner=scriptRunner;
}
The getTooltip method can return a tooltip displayed in EyeStudio.
public String getTooltip()
{
return "Adds all parameters";
}
Selenium commands are stored in the “custom/selenium” folder and they are automatically loaded when EyeAutomate or EyeStudio starts.
A Selenium command is just like any other custom command. See the Custom Command section for instructions. Add or modify the classes, in the “custom/selenium” folder, and restart EyeAutomate when done.
A Selenium command may get and set the currently used web driver using the methods:
public void setWebDriver(WebDriver webDriver)
{
this.webDriver=webDriver;
}
public WebDriver getWebDriver()
{
return null;
}
Study the commands in the “custom” folder. All EyeAutomate commands are provided with Java source code.
EyeAutomate installs with a set of sample scripts. Open the scripts using the File/Open menu option. Study the scripts to learn how to solve common situations. Below is a list of some of the scripts installed with EyeAutomate:
Script | Description |
EyeAutomateRegressionTestSuite.txt | Tests that cover many of the features in EyeAutomate. |
HorseRace.txt | A horse racing game. |
PacMan.txt | Moves a number of ghosts around on a board. |
CalculatorDemo.txt | Run the recorded calculator script. |
Google.txt | Search Google from a parameter value. |
Wikipedia.txt | Search Wikipedia from a parameter value. |
YouTube.txt | Search YouTube from a parameter value. |
This chapter contains a few solution suggestions of how to handle some common situations.
Images are small screen captures. The target location or area is in the center of the small screen capture by default.
Use the Properties dialog to change the target location on a Move command (like Move or Click). You may also change the target location into a target area. Use the mouse to click and drag in order to select a target area of the image. A target area is more specific than a target location and can be used to make the script more reliable in some situations. Both the target area and the surrounding area needs to be verified in order to accept the location. Note that selecting a too large or improper target area might have a negative impact to the image detection.
Use the Properties dialog to change the area to check in a Check command. Use the mouse to click and drag in order to select the target area to check. Both the area to check and the surrounding area needs to be verified in order to accept the match. It is, in other words, not enough that the area to check can be found on screen. A target area is automatically selected if no area to check is specified.
Use the Properties dialog to change the selected area on a Capture, Read or Region command. The entire image is used by default but the blue selection rectangle can be used to, for example, only capture a smaller area of the image.
The ConfirmationLevel can be adjusted to make the comparison less or more tolerant to deviations between the image and the appearance on screen. Increase the value if EyeAutomate finds an incorrect image or reduce the value if an image cannot be found.
A human often waits for something to appear on screen before continuing. There are several different ways to delay the script.
The simplest , but also the most unreliable, is to wait a fixed number of milliseconds. A large number slows down the script while a too low value might not be long enough.
Use the Wait command, with no parameters, to delay the script until something, like a new page or dialog, appears on screen. It will also wait until the screen has become stable again. Wait ignores small changes (less than 1000 pixels). This is a quick fix but might be unreliable in some situations.
The most reliable delay is to wait for an image to appear on screen. It is also possible to provide more than one image to the Wait command. The command will continue when either of the images appears.
How to handle a situation when a command might fail for some reason. The script would become a lot less fragile if you could provide one or several ways to handle a problem when running the script.
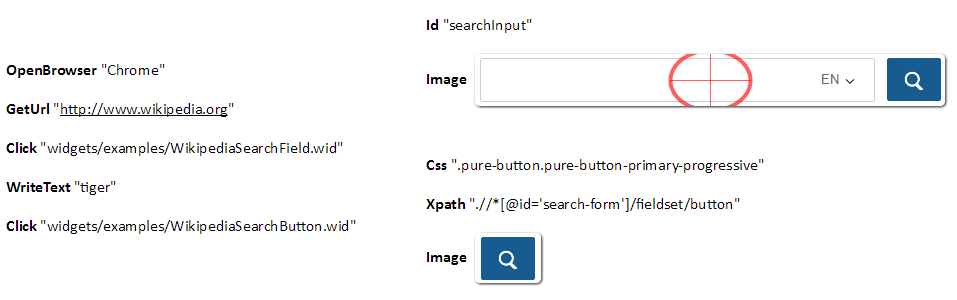
There are several ways of recovering from an error in EyeAutomate. One way is to let the tester handle the failed step manually. Use the Begin and End commands for this. Place the Begin command before the first line to be able to recover from and place the End command after the last line to recover from. The Begin/End block will in this case represent one operation that can be performed both automatic and manual.
An example of a Begin/End block:
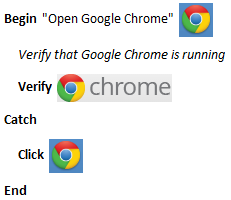
Use the Catch command inside a Begin/End block to try to recover automatically. The step will still be handled manually if the Catch/End block fails.
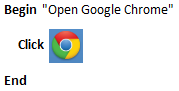
The example below will start Google Chrome from the Start menu if not already visible:
You may use any number of Catch commands inside a Begin/End block.
Remember that it is possible to insert images into the manual instruction. An image may make it easier for the tester to follow the manual instruction.
Images are important in EyeAutomate. Here are some tips on what to think about to get the best script run result.
The ImageFolder is a built-in parameter designed for making it really easy to develop scripts that uses different sets of images. This makes it possible to run the same script on, for example, various operating systems or in different screen resolutions.
Change image folder used by EyeStudio using the Set image folder option in the Settings menu. Recapture all images when using the other operating system or screen resolution. Create a test suite and call the same script twice but with a different file-path in the ImageFolder parameter, like in the example below:
Call "ImageFolder=images" "scripts/calc1.txt"
Call "ImageFolder=images2" "scripts/calc1.txt"
EyeStudio and the EyeServer can be connected to make it easier to develop and run scripts on a remote machine.
Enable a remote connection by selecting the Remote Connection option in the Remote menu. Enter the address and port to the EyeServer to connect with.
Enter the address to the remote server using the following format:
http://[server address]:[port]
To, for example, use the server on your local machine:
http://localhost:1234
There are three new options options available from the File menu when the remote connection is enabled:
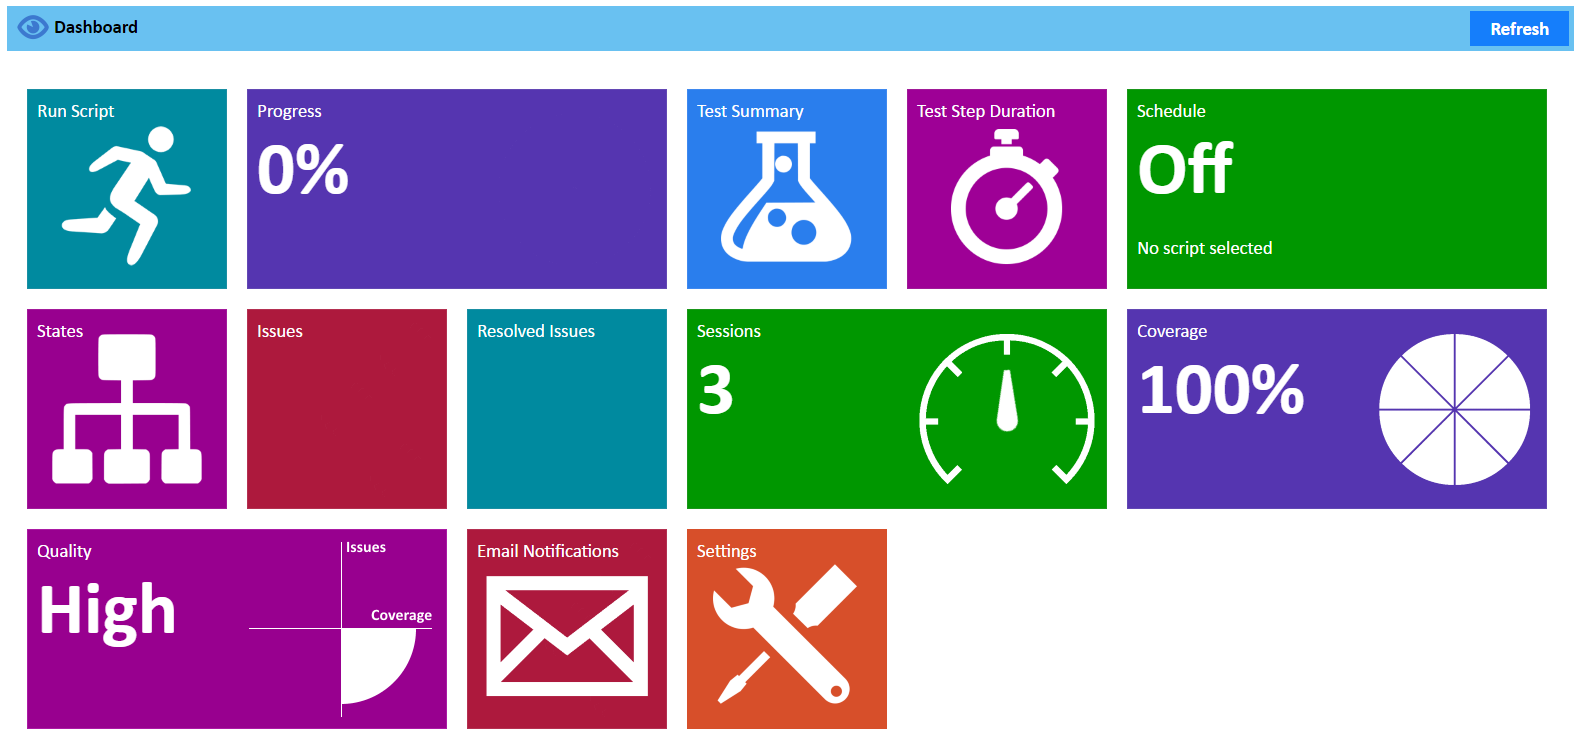
The dashboard provides easy access to most of the reports and features of the EyeServer. Use the dashboard to run scripts, follow the progress, view test results, and adjust settings.
Open the dashboard using the URL:
http://[server address]:[port]
for example:
http://localhost:1234
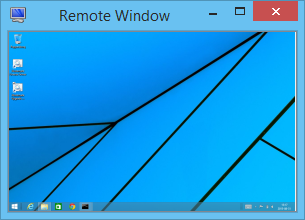
The Remote Window makes it possible to view and remote control a machine that has a running instance of the EyeServer.
Make sure that you have enabled a Remote Connection from the Settings menu.
Open the Remote Window from the Remote Window option in the Remote menu in EyeStudio.
Send commands to the remote machine using the mouse or keyboard.
Selecting any of the the Run options in EyeStudio will synchronize and run the script on the remote machine.
Images will now be captured from the Remote Window instead of the entire screen. Note that images are always captured correctly regardless of the size of the Remote Window.
Recording a script is performed by using the mouse and keyboard inside the Remote Window. Note that a script can be recorded on all platforms.
Managing scripts and images can be difficult in a larger team. This problem can be handled by using a version control system. Teams that do not have a version control system in place or find it difficult to use such a system can benefit from using the file synchronization feature in EyeStudio.
Make sure that you have enabled a Remote Connection from the Remote menu.
Synchronize with other clients using the Synchronize option in the Remote menu. All changes since the last synchronization will be downloaded and uploaded.
No files are deleted only inserted or replaced. Files that are overwritten on the EyeAutomate Web Service side is first backed up by adding the “.old” extension.
Clients that are added to the synchronization should have a similar starting point, for example a clean installation of EyeAutomate. A newly added client will receive a lot of changes when performing the first synchronization.
Note that the file synchronization will not work properly when running EyeStudio located in the same folder as the running EyeServer.
The “filter.properties” file is used, on the client side, when determining what local files to synchronize with the server. This file contains a list of regular expressions of what to include.
All files in the EyeAutomate installation is targeted for synchronization, by default. Change the RootFolder to synchronize that folder only.
Each row in the “filter.properties” file specifies one path that should be synchronized. The example below contains the default filter:
images/.*\.png
scripts/.*\.txt
data/.*\.csv
Selenium WebDriver can be used for creating scripts with a combination of both structural and visual techniques. The script can take advantage of the strengths and avoid the weaknesses of both technologies.
The latest version of Selenium WebDriver is installed to the “bin/selenium” folder when EyeAutomate is installed or upgraded. You may replace the “bin/selenium” folder with a newer version of Selenium at any time but remember to restart EyeStudio.
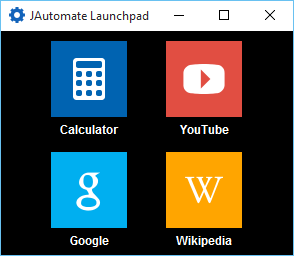
The EyeAutomate Launchpad makes it easier to quickly launch your favourite scripts. The Launchpad contains a fully customizable set of scripts, images and titles.
Start the launchpad by double-clicking on the “EyeAutomateLaunchpad.jar” file.
The “launchpad.csv” file in the settings folder contains the links, images and titles displayed on the launchpad. Use a text editor to modify the CSV file. The default configuration is shown below:
title image script
Calculator icons/calculator2.png scripts/CalculatorDemo.txt
YouTube icons/youtube2.png scripts/YouTube.txt
Google icons/google2.png scripts/Google.txt
Wikipedia icons/wikipedia2.png scripts/Wikipedia.txt
View your test results from a set of customizable reports. Generate and view a report from the Reports menu in EyeStudio. The reports are based on the statistics stored in the “test_history.csv” and “test_steps.csv” files. EyeStudio stores test statistics from all test runs in the CSV files.
All reports in EyeAutomate can be customized using the templates provided. Each type of report has its own template. The templates can be found in the “report_templates” folder and their filename ends with “_template.htm”. You may customize anything from font, language, date & time format, colors and formatting.
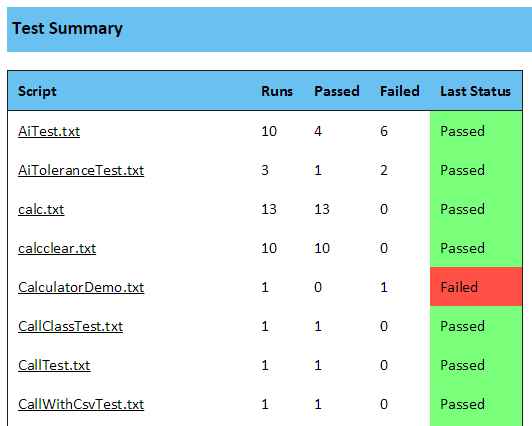
The Test Summary Report lists all tests that have been run. Click on the script filename link to get more information about each run.
The table columns are:
Column | Description |
Script | The filename of the script. |
Runs | The total numbers of times run. |
Passed | The number of times that the script was run without problems. |
Failed | The number of failed runs. |
Last Status | The status (Passed or Failed) of the latest run. |
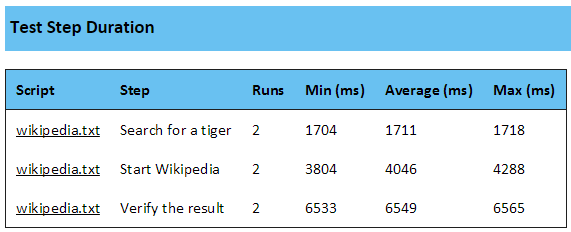
The Test Step Duration Report shows statistics from the execution time of all Steps. Note that commands that are not part of any Step will not show up in the report. This report can be used for evaluating the speed of the application under test.
The table columns are:
Column | Description |
Script | The filename of the script. |
Step | The step description. |
Runs | The total numbers of times run. |
Min (ms) | The lowest execution time in milliseconds. |
Average (ms) | The average execution time in milliseconds. |
Max (ms) | The highest execution time in milliseconds. |
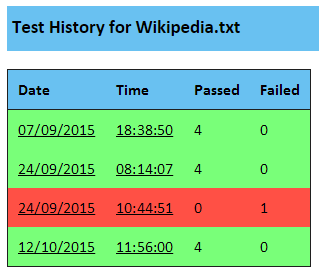
The Test History Report lists all runs for a given script. Click on the date or time link to get more information about the script execution.
The table columns are:
Column | Description |
Date | The date that the script was run. |
Time | The time that the script was run. |
Passed | The number of commands that was executed without problems. |
Failed | The number of failed commands. |
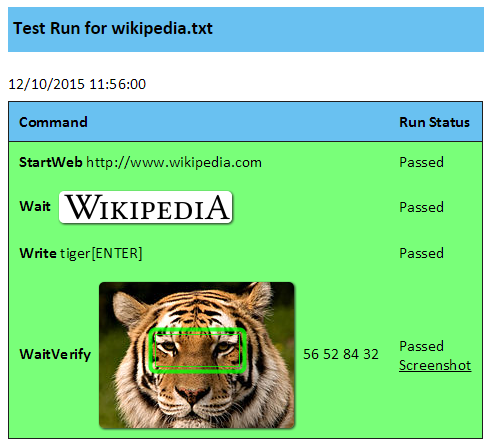
The Test Run Report lists all commands that have been executed in a test run. Failed commands will also have a link to a screenshot that shows the actual screen at the time of the error. A screenshot will also be included for captured images.
The table columns are:
Column | Description |
Command | The script command. |
Run Status | Passed or Failed. A screenshot will be included for Failed and Capture commands. |
The Test Steps Report lists all commands in a script.
The Manual Test report lists commands in a script as a manual test instruction.
Command names are translated into native text into using the “manualtest.properties” file. The “manualtest.properties” file can be translated into your preferred language.
Note that the only commands that will appear in the report is the commands listed in the “manualtest.properties” file.