Augmented Exploratory Testing
Table of Contents
EyeScout is a tool for augmented exploratory testing. A manual test session is enhanced by visual on screen instructions provided by a virtual assistant.
EyeScout is a client server solution and requires an EyeServer installation to connect with. This section contains information how to setup the client and server.
Note that the client and server should run on different desktops. Mac users may install and run the server on one user account while running the EyeScout client on another. The ideal setup is to install the EyeServer on a desktop in a virtual machine. You may however need to first connect to the server desktop using Remote Desktop or a VNC client so that the desktop is active during the session.
EyeScout is 100% pure Java and contains no native code. This means that you will be able to use it on any platform that supports Java.
EyeServer should be installed on one or more machines that the test sessions are performed on. The EyeScout clients must be able to access the EyeServer machines. Follow the steps below to install the server on a new machine.
Start the EyeServer by double-clicking on the "EyeServer.exe" or "EyeServer.jar" file or using the command:
"java -jar EyeServer.jar"
The server uses port 1234 by default. Change the port by passing a parameter to the "EyeServer.jar" file, for example:
"java -jar EyeServer.jar -p 1235"
Verify that the server is running using the hello command:
http://[server address]:[port]/hello
Stop the server by stopping the process or using the kill command:
http://[server address]:[port]/kill
EyeServer requires a license or a trial license key. A trial license may be provided by default by the setup program.
Purchase a license from: eyeautomate.com/purchaseeyeserver.html or request a trial license from: eyeautomate.com/download.html
Paste or type the license key into the License Key field on the Settings page. Press the Save button to activate the license key.
The EyeScout client should be installed on one or more client machines that have access to the EyeServer. Follow the steps below to install the client on a new machine.
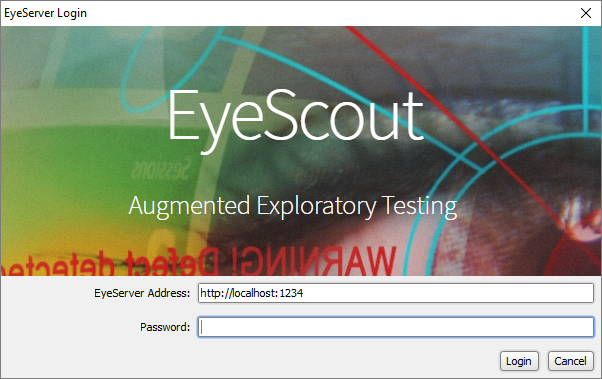
Login to an EyeServer from the EyeScout client. Specify the address to the server followed by the port according to the format:
http://<ServerAddress>:<ServerPort>
Optionally provide a password. The server does not require a password by default.
This chapter explains how to perform a test session using EyeScout.
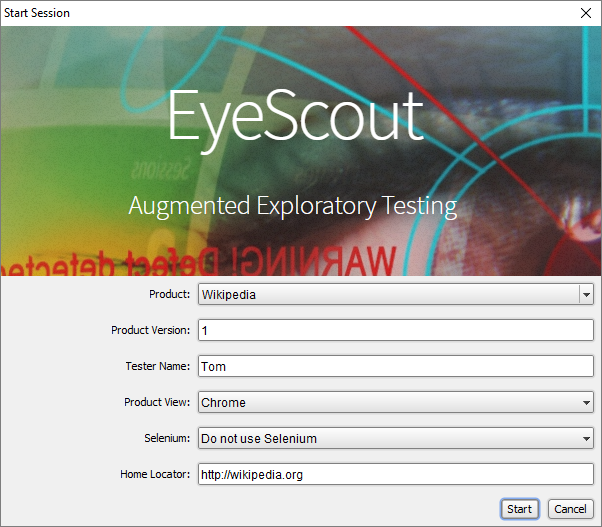
Start a new exploratory test session by clicking the Start toolbar button.
Enter a name of the product you are currently testing or select an existing product from the drop-down list.
Enter the current product version or release number. Can be a number, text or both.
Enter the name of the tester. This field is optional.
Select a Product View. Use Desktop to test desktop applications and any other option to test a web application using a Selenium enabled browser.
Note that you should not run the client and server on the same desktop since that might result in infinite recursion of the display.
Decide to use Selenium or not when testing a browser application. Select the option that works best with your application. Note that you might run into various problems depending on the application, browser version, Selenium version and platform. Selenium properties are recorded, regardless of this option, when applicable.
Home Locator is a web site, application or script to launch that takes the application to the Home state when the session starts.
A new session should always begin in the Home state. The Home is a well defined application state. An application that depends on information inside a database should reset the entire database before or when starting a new session. External systems should be mocked or be in a well defined state.
Web applications typically start at a certain web address. The Home Locator could, for example, look like this:
http://wikipedia.org
Some web applications rely on cookies. Set the “load_cookies” and “save_cookies” options, under Advanced settings, if needed. You may also save existing cookies using the SaveCookies command, for example:
http://localhost:1234/SaveCookies
A desktop application might be started using an exe or bat file on Windows. Simply set the Home Locator to the local path on the EyeServer machine, for example:
c:/programs/application.exe
A home state that requires a more advanced setup, like performing some GUI operations, can be handled using an EyeAutomate script or bundle. Create and maintain the script using EyeStudio. Export the script as a bundle (eye file) and place the file in the “scripts” folder in the EyeServer installation. The Home Locator should then contain a relative path to that bundle, for example:
scripts/myhomelocator.eye
A scenario can be run using several Product Views in order to test it in several browsers. Right-click an action and select the Relocate option to adjust an action, check or issue that has a different appearance or location than in other Product Views. EyeScout stores images and locations for each Product View. This makes it possible to run and maintain scenarios in several browsers at the same time using the same Project.
Simply use the mouse or keyboard to perform the actions in order to complete your test session. Right-click a location on screen to perform some actions like RightClick or Move. Paste and copy text to/from the external machine just like you do on your local machine.
When performing another session the previous actions will be augmented on screen. Click on a blue circle to perform the action and to follow that path. The recommended action is larger than the other actions. You may deviate from a previous path at any time. Click the Unguided button to hide the augmented information.
Hover over an action to get information about the type of action, any parameters and the coverage. The coverage is displayed using a pie-chart where a full circle is 100% coverage of the actions below the selected one. A fully covered action is dashed.
Suggestions may appear as a pink circle. A suggestion is a suggested action from the system. The suggestion will turn into an action if manually performed. Auto exploration will never select a suggestion.
Click the Auto button to automatically click on the recommended actions until the coverage is 100%. Auto exploring will stop if a check or issue cannot be validated or there are no actions to select.
You may add a check or an issue at any time by using the Insert drop-down button. Select an area using the mouse and add a description for an issue. Checks are green and issues are red by default.
A check or issue that cannot be validated are indicated by a yellow color. Remove or relocate a non-valid check. Resolve, remove or relocate an non-valid issue.
A bookmark is a named state. The root state has the name Home, by default. Bookmarks are useful when replacing a state with a bookmarked state.
Click the Bookmark drop-down button and select an existing bookmark to replace the current state with the bookmarked state.
Click the Bookmark drop-down button and select New Bookmark to name or rename the current state.
Click the Bookmark drop-down button and select Remove Bookmark to remove the bookmark from the current state.
Right-click an action, check or issue to view available options. Below is a list of options with a short description.
Option | Description |
Perform | Performs an action. Same as left-clicking using the mouse. |
Edit Text | Edits the text of a check, issue or action. Only Type and Paste actions can be edited. |
Comment | Add or edit a comment on an action. |
Relocate | Move the action, check or issue to another location. Left-click to select another location for an action. Left-click and drag to select another area for checks and issues. |
Skip | Skip to the next state without performing an action. |
Remove | Removes an action, check or issue from the current state. Child states or actions are not removed but may be impossible to reach. |
Cut | Cut out an action. Any child actions, to the selected action, are not removed, they will move up to the current state. |
Insert | Insert the next action before the selected action. |
Resolve | Resolves an issue. The issue will be replaced by a check. |
Right-click outside an issue, check or issue to view the action options.
Option | Description |
Right Click | Insert a mouse right-click action. |
Move | Insert a mouse move action. |
Select | Select an option in a list or drop-down. Select will only work when using Selenium and when a list or drop-down is in focus. |
Paste | Insert a paste action. Note that you may also simply use the keyboard to paste the content of the clipboard to the external system. |
Comment | Add a comment for the next performed action. This makes it possible to comment while recording instead of commenting when performing the same scenario again. |
Go Home | Insert an action that triggers the Home Locator. This takes you back to the Home state. |
Start | Start a new website, application or script. Specify an URL, like “http://wikipedia.org”, to go to a website. Specify a path, like “c:/apps/myapp.exe” to open an application or a file associated with an application. Specify a script, like “scripts/myscript.txt” or “scripts/mysuite.eye” to run an EyeAutomate script. |
Click the Follow button and select a previous session to follow. This will augment the path of a previously recorded session. Note that you may also press the Auto button to perform the path automatically.. Follow will stop when the path is completed. You may only begin to follow a path from the Home state.
Click the Navigate button and select an issue or bookmark to navigate to. This will augment the shortest path to the issue or bookmark. Note that you may also press the Auto button to automatically move towards the target. Navigation will stop when the target state is reached.
Before stopping the session it might be a good idéa to go back to the Home or another known state in order to enable regression testing. Use the Bookmark menu to select the current state. The last performed action will now go to the selected state. You may alternatively right-click and select the GoHome option to perform the Home Locator.
Stop the session by pressing the Stop button. You may also temporarily pause a session by pressing the Pause button. Continue recording the session by pressing the Resume button.
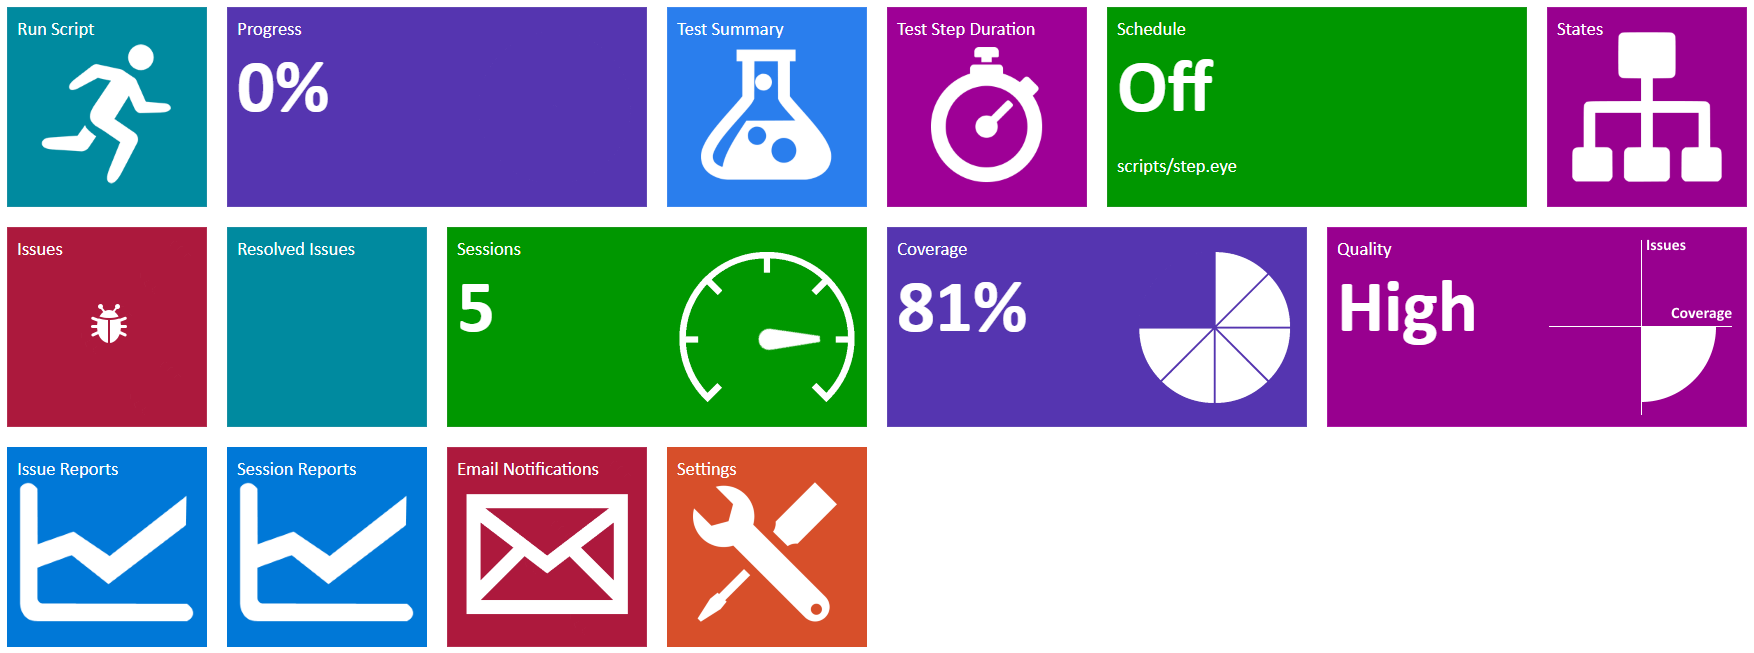
The dashboard displays the current status of the test effort. You may also use the dashboard to change settings, generate reports, start sessions or running scripts. Select the Dashboard option from the View drop-down to open the dashboard. The status displayed is for the current Product and Product Version. Select the Settings option to change the Product or Product Version.
In the example screenshot above we have 5 sessions performed in the current Product Version with a total state coverage of 81%. We have one remaining issue and the Quality is High since we have high coverage and a low defect rate when compared to previous Product Versions.
Select the Sessions option to view all the sessions performed on the current Product Version. Select the View button to view all the steps performed. Select the Run button to start a new auto session performing the same scenario again in the same order as before.
Select the Coverage option to view the coverage of all bookmarked states in the current Product Version. Select the Run button to start a new auto session that focus on covering the selected bookmark.
The Quality option shows the quality of the current Product Version. Select the Quality option to view the relative quality of each Product Version. The table below shows how the quality is estimated. Reported Issues are the number of issues created in a Product Version.
Reported Issues | Coverage | Quality |
Low (less than average) | Low (less than average) | Unknown |
Low (less than average) | High (higher than average) | Low |
High (higher than average) | Low (less than average) | Low |
High (higher than average) | High (higher than average) | High |
Select the Issues option to view all reported issues, in any Product Version, that are still unresolved. Use the plus or minus buttons to adjust the priority. Click the Resolve button when the issues has been resolved. It will then be moved to the Resolved Issues list. Note that you may also resolve an issue when in a session.
Select the Resolved Issues option to view issues resolved in the current Product Version. Click the Unresolve button to move the issue back to the Issue list.
Select the States option to view the tree of states created for the current Product. Traverse through the tree by clicking on the next state links. Actions with a large weight are manually performed more often than small weights.
Custom reports like the Issues and Sessions reports are server plug-ins and provided with their Java source code in the “plugin” folder. The Sessions Report generates one Word document per session for the current Product Version. All actions and issues are included. Check are included only if the text has been modified. The Issues Report generates one Word document for each issue. The report contains all the steps needed to reproduce the issue.
Suggestions are custom server plug-ins automatically loaded from the “plugin” folder. Suggestions are pink circles that suggest an action to perform. A suggestion will only become an action if a user manually performs it. Auto exploration will never select any suggestions.
EyeScout has been designed to support four different types of users described below:
Name | Description | Needs |
Scenario Recorder | Uses EyeScout to record user scenarios that can be used for creating tutorials. | A cost efficient way of documenting user scenarios. |
Exploratory Tester | Uses EyeScout for manual exploratory testing and for reporting issues. | An efficient way of exploring new untested scenarios in order to discover remaining issues. |
Smoke Tester | Uses EyeScout for rapid development and maintenance of a smaller smoke test suite. | To quickly check that the most used features are still working from a user perspective. |
Regression Tester | Uses EyeScout for creating and maintaining a regression test suite. | To check that all important features of the application are still working from a user perspective. |
This chapter describes the basic theory and concepts around augmented exploratory testing. Read the research material for more detailed information.
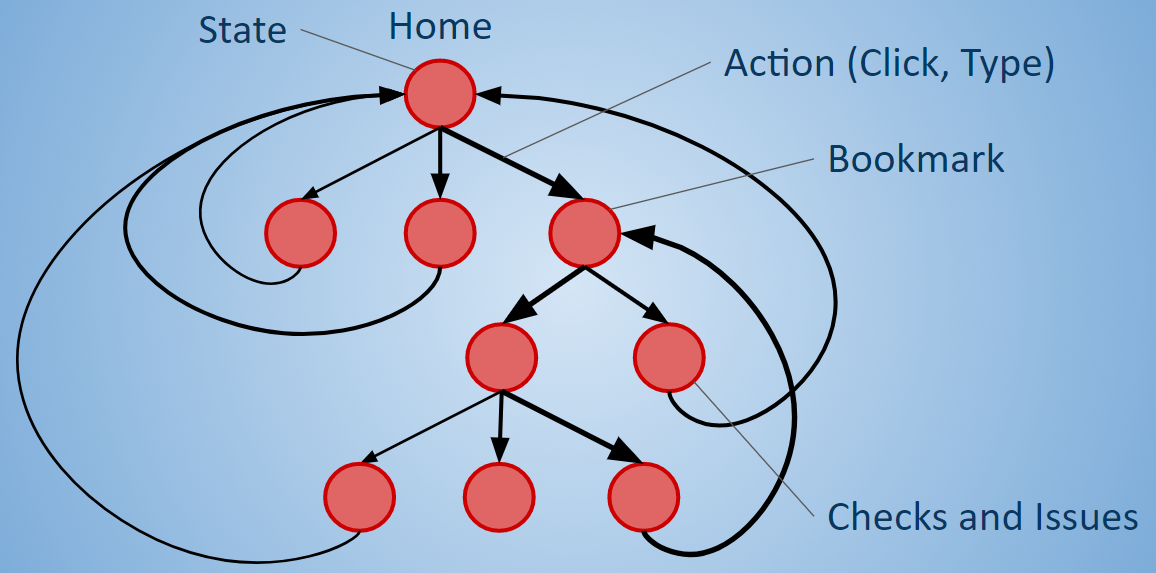
An application state is a known condition of all internal and external variables that might have an impact on the output from the application under test. The initial state is called Home.
A user action takes you to another application state. A user action is anything performed by the mouse or keyboard like clicks and typing on the keyboard.
A bookmark is a named state. The root state is called Home, by default.
A state may contain any number of checks and/or issues. Checks and issues are validated when you enter a new state. Checks are green when validated and yellow when there is a deviation. Issues are red when validated and yellow when there is a deviation.
A state that does not contain any actions are called leaves. Leaves should be avoided to make regression testing possible. Right-click and insert the Go Home action or select an existing bookmark from the Bookmark drop-down. You may also replace the leave state with a bookmarked state using the Bookmark drop-down button.
EyeScout uses the latest available technologies in the areas of test automation, image recognition and AI.
EyeScout uses multi-locators in order to locate and check widgets in a reliable way. The following techniques is used when locating widgets:
Technique | Description |
Absolute coordinates | Absolute x and y values and sometimes width and height relative to the upper left corner of the display. |
Relative coordinates | Relative distance from the previous action. |
Image recognition | An image to find or check a location. A location will be updated if the system finds that a widget has been moved to another location. |
Selenium properties | Widget properties like id, name, text and href will be detected and used when using web applications. |
OCR | Optical Character Recognition for reading a value from the screen. |
The state tree resembles a neural network that is automatically updated by every session. Weights are strengthened when an action is manually performed. New paths are added when a user decides to explore new scenarios.
Suggestions are custom algorithms that help the tester in several ways like:
Suggestion | Description |
Similar Scenario | Suggest to reuse actions from similar scenarios. This will make the maintenance of the tests a lot easier. |
Boundary Value Analysis | Suggest important boundary values to try based on previously entered data in a field. This prevents the tester from forgetting to test an important value. |
New Examples | Suggest new examples based on the previously entered examples. This will make it easier for the tester to create new scenarios. |
Next Value | Learning from previous examples and suggest, for example, the next date in the correct format. This makes it easier and faster to enter field values. |
Below is a list of settings that can be used for detailed configuration of the server.
Use the SetServerProperty command for setting the properties. The properties are stored in the “webservice.properties” file in the “settings” folder.
Set a property using the format:
http://<host>:<port>/SetServerProperty?key=<PropertyName>&value=<PropertyValue>
Property | Description |
weight_threshold | Actions below this threshold are hidden from the user. The default threshold is 10 percent. |
weight_factor | Increase this factor to value action weights more. 1 by default. |
coverage_factor | Increase this factor to value coverage more. 1 by default. |
random_factor | Increase this factor to value random decisions more. 0 by default. |
coverage_count | The number of steps to give coverage bonus. The count is reduced by one for each step. |
load_cookies | Set to “yes” to to load cookies when starting a browser session. Default “yes”. |
save_cookies | Set to “yes” to save cookies when ending a browser session. Default “yes”. |
use_selenium_properties | Set to “yes” to use Selenium properties when finding and performing actions. Default “yes”. |
record_selenium_properties | Set to “yes” to record Selenium properties when exploring. Default “yes”. |
use_selenium_browser | Set to “yes” to use Selenium without a desktop. This option does not work with all browsers. Default “no”. |
simulate_activity | Set to “yes” to trigger a keyboard action (a shift press and release) every 5 minutes to prevent the screen saver. Default “yes”. |
close_browser_shortcut | The shortcut to type to close the browser in the end of a desktop session. Default "[META_PRESS]w[META_RELEASE]" or "[CTRL_PRESS]w[CTRL_RELEASE]" on a Mac. Insert the key [PAUSE] to include a one second delay. |
close_app_shortcut | The shortcut to type to close an application in the end of a desktop session. Default "[META_PRESS]q[META_RELEASE]" and "[ALT_PRESS][F4][ALT_RELEASE]" on a Mac.Insert the key [PAUSE] to include a one second delay. |
Below is a list of settings that can be used for detailed configuration of the currently active product.
Use the SetProductProperty command for setting the properties. The properties are stored in the “product.properties” file in the product folder under the “data” folder.
Product properties inherits the current server property value. Assign values that affect all products using server properties.
Set a property using the format:
http://<host>:<port>/SetProductProperty?key=<PropertyName>&value=<PropertyValue>
Property | Description |
load_cookies | Set to “yes” to to load cookies when starting a browser session. Default “yes”. |
save_cookies | Set to “yes” to save cookies when ending a browser session. Default “yes”. |
use_selenium_properties | Set to “yes” to use Selenium properties when finding and performing actions. Default “yes”. |
record_selenium_properties | Set to “yes” to record Selenium properties when exploring. Default “yes”. |
use_selenium_browser | Set to “yes” to use Selenium without a desktop. This option does not work with all browsers. Default “no”. |